
Welcome, from sunny Australia!
Differentials, Tailshafts, and Brakes
Differentials, Tailshafts, and Brakes
Shortcut to -
LSD's
Tailshafts
Brakes
Differentials
WAY too much to talk about here, but
one clever trick that helps the handling of a live axle read end car
is to bend the diff housing. You have to put them into a very large
hydraulic press and rig up some strong bracing to hold them, but it is
possible to get a half degree or so negative camber into the housing an
also a millimetre of toe-in. It may not sound like much, but those
small amounts will helps immensely to make the car more stable at all
times. It's also rather surprise just how far you have to bend the diff
housing to make it stay bent!!
There's nothing terribly tricky about the internals of a differential, so all you have to do is to set up the clearances as per the manual.
One thing that's always annoying is
getting the darn filler and drain plugs undone! They always seem to
strip the head ... The way out of that is to weld on a large nut
to the plugs so you can get a big spanner to undo the little darlings
...
BTW, when you weld the nut on, make sure
that you remove the EFI computer from the wiring loom and also
disconnect the battery. Don't say I didn't warn you.
Limited
Slip Differentials
One good gadget to have in the rear end is
an LSD, or Limited Slip Diff. What this thing does is create a link
between the rear wheels (or front wheels, in a FWD car, and often
between the front and rear wheels as well in a 4WD) so that instead of
letting them spin freely with respect to each other, they have a
certain amount of friction. I'll be talking about three types, but only
two in any detail. The cheapest and certainly the nastiest to drive is
what we call in Australia as the 'CIG Locker'. What this means is that
the centre of the diff has been welded up (By using an oxy welder,
almost invariably powered by CIG gasses, gettit??) so that the rear
wheels are solidly locked together. This makes the car very hard to
turn around slow speed corners, as the inside tyre wants to rotate at
the same speed as the more heavily loaded outside, and so tends to push
the car in a straight line - big time understeer! If you have enough
power, then you can get both rears spinning nicely, and so create and
control the oversteer that will then develop. You really have to drive
the car on the throttle a lot more than a 'normal' car, and so they can
be a quite tricky unless you get used to it quickly.
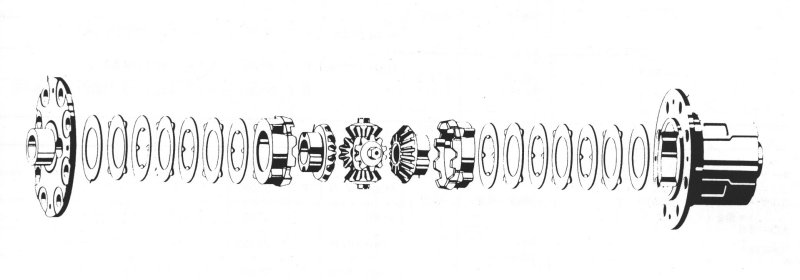 |
What's far more common - and pleasant to drive - is the Salisbury (pro: Sawls-bree) LSD. All they are is a conventional open diff, but with a clutch pack on the axle diff gears so that there is friction created between the rear wheels when they rotate at different speeds. In an exploded view, they look a bit like this diagram shows. |
| After a while - depending on how you drive the car, etc - the clutches will wear out and the 'slip factor' decreases to the point where the LSD isn't a lot better than an open diff. This is a cutaway view of one | 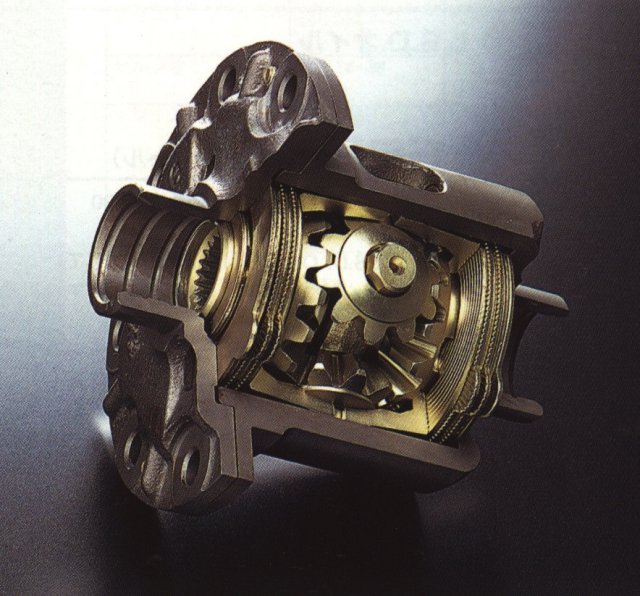
|
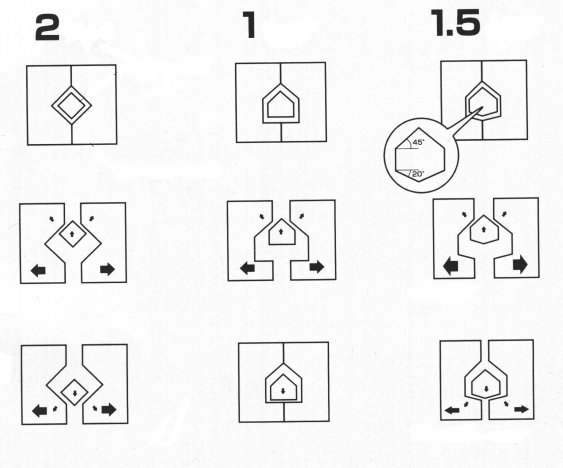 |
If you have a look at the above picture, you'll see a small shaft sticking out the side of one the diff gears - This is the shaft that controls the 1, 1.5, and 2 way action. See this pic to get an idea as to how it works. |
Possibly the best LSD of all is the Torsen 'torque sensing' type. They are a very good thing, as they always spread the torque evenly between both wheels at all times, so even if you have one tyre on ice and the other on sandpaper, both wheels will spin evenly. There are two types of Torsen, and this is a Type One.
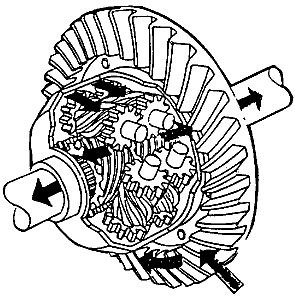
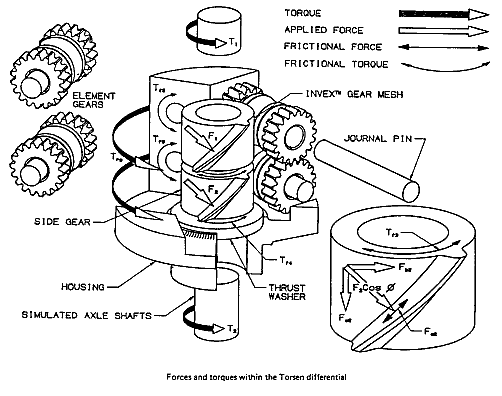
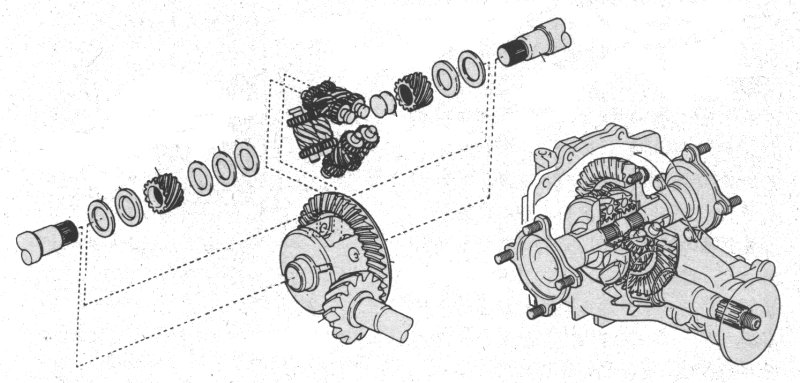
The Type One Torsen LSD that does a pretty good job and is available on a lot of Toyota cars from about the mid 90's onwards. This is an exploded view of a complete diff -
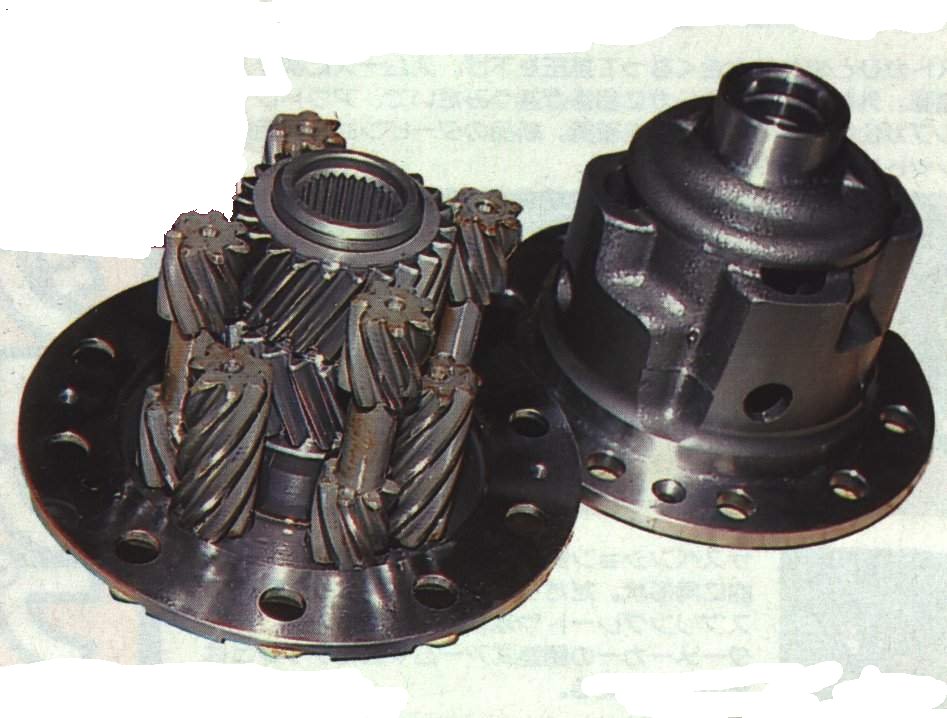
Here's a view of the LSD gears themselves -
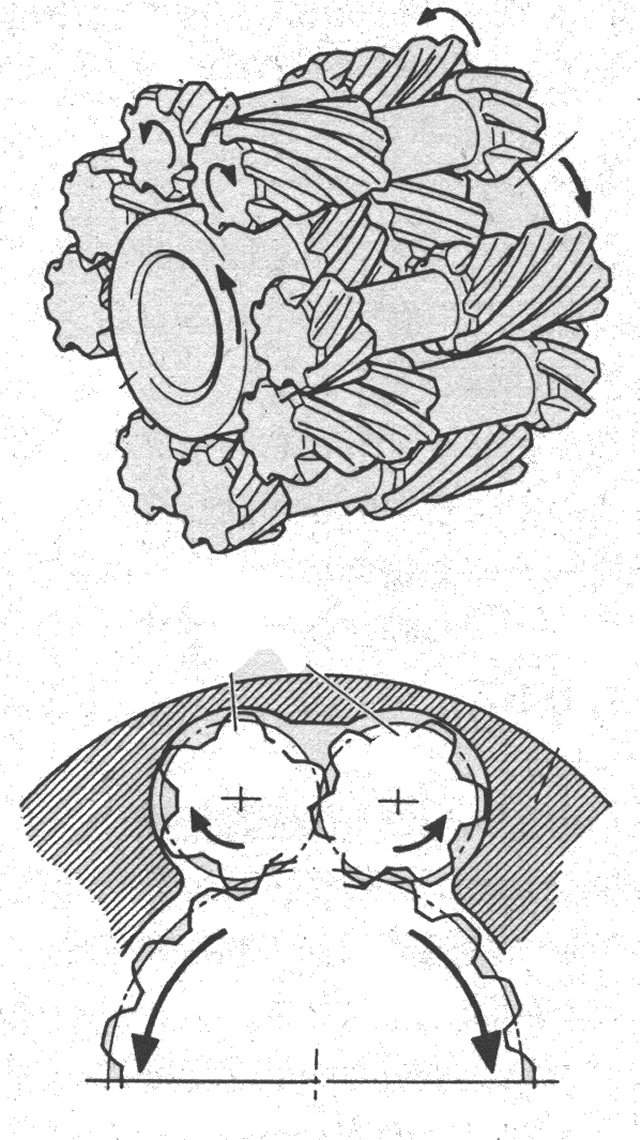
And finally, a view of the action that the LSD gears take to provide the LSD effect -
Tailshafts
Fortunately, not a lot to be said about
tailshafts. There's only a couple of tricks to them, and by far the
most important one that people often don't know is -
- The universal joints at either end MUST be
lined up exactly parallel to each other. By this I mean that the cups
at
the end of the tailshaft must be in line as you look down the
tailshaft.
If this isn't the case, then the tailshaft will destroy itself and the
universal joints rather quickly! The reason for this is because as
they spin around uni-joints don't follow a constant rpm. This
increases with the deflection angle, so if you have them out of line
on your tailshaft then one end is trying to do one rpm, and the far end
is trying to do a slightly faster or slower one, every
revolution! This can sometimes be felt as an incurable vibration
in the car which gets worse as the speed builds up.
- Try to keep the diameter as small as
possible to reduce rotational inertia. As a general rule though, the
smaller the diameter then thicker the tailshaft tube metal has to be,
partly negating the advantage of a smaller tube.
- The correct length is when the car is at
ride height, the front yoke's back face of the tailshaft is flush with
the back of the gearbox housing. Make sure that there is at least 15mm
to 20mm of further travel in both directions (In & out) of the
tailshaft at full bump & droop on the rear suspension.
- Most modern cars have a two piece
tailshaft. This is only to reduce vibration. (Have a look at one if
you get a chance - One part is always longer than the other to reduce
harmonic vibration. Clever!) For a performance car, this is a
waste of time, and it should be replaced with a one piece unit.
- A lot of modern tailshafts also have the
uni-joints peened in so they can't be changed an so you have to buy a
new tailshaft, at great expense. Not so - Just take it to a decent
engineering shop and get them to re-fit the tailshaft with normal,
replaceable type uni's. The cups that sit in the yokes will have to be
bigger than they were, but that's no big deal compared with the
alternative ...
- A universal joint is ok when it shows no
signs of 'feeling tight' when you work it around with your hands. If
it feels the slightest bit tight or overly 'loose' at any point, then
change it.
- There are types of tailshafts that have
the uni-joints held in with small U-bolt type devices. These are junk,
and should be replaced with fully enclosed (The metal goes all the way
around type) yokes.
Brakes
A much abused device. :)
There are a few ways of increasing braking
power -
- Bigger discs. A bigger disc, even with no
other changes, will increase stopping power by quite a bit. They do
this by increasing the leverage effect that the brakes have on the
wheel. If you have a 9" disc and go up to an 11" disc, you've just
increased your braking power by a good 22% (5.5" effective lever
arm compared to a 4.5" effective lever arm)
- Four spot calipers. They give a much more
even spread of pressure on the brake pads, and so make the pad work
more efficiently. The reasons for this are that the twin pistons per
pad are pushing over a wider base than a single piston ever could, and
the four piston calipers are inherently more rigid than a two spot or
single pot slider caliper is. The better four spot calipers have
differential sized pistons, ie, the 'front' piston is bigger than the
'rear' piston. (I'll explain why shortly)
- Better pads. Modern pads are bloody
fantastic. Price = Performance though, so how fast do you want to stop?
What other variations in brakes do -
- Twin calipers. Used to get more pad area
on that brake, and usually has one caliper at the front and the other
in the back. Not often used.
- Ventilated discs. The gap in the middle
does a couple of things for the same result. The main reason is to
give the disc double the surface area to help it dump its heat into
the atmosphere. The other thing the gap does is to use the vanes
to pump (centrifuge) air through the gap to help dump heat faster.
- Drilled discs. Exactly the same reason as
a ventilated disc, but not quite as good. The size of the holes in the
disc is worked out so that the surface area of the cylinder they make
is larger than the hole they make in the disc, and so create a greater
surface area overall to help cooling. The other advantage is that the
holes help the plasma hot gasses from the pads escape somewhere.
- Slotted discs. No extra heat dissipation,
but a slot that passes over the pads to help the hot gasses escape.
The slots need not be put on the disc like spokes on a bike wheel, but
can simply be a slot that goes across the disc from one side to the
other side, just clearing the inner running surface of the disc.
As pads wear down, they will become
tapered. This is because as they are applied the disc heats up and
part of that heat is transferred to the pad itself. The problem is
that the heat is not transferred equally - The outer part of the pad
(The part closest to the outside of the disc) gets hotter because the
physical speed of the disc is higher there than it is towards the
centre.
The same goes for the part of the pad that
is last to touch the disc as it goes past - The disc is somewhat
warmer at that point than it is as it first touches the pad, and so
the pad wears faster at that point.
Some of the taper problem can be relieved by
making the discs bigger (The difference in speed between the inner and
outer parts of the disc is lessened) and using a decent four spot
caliper. I mentioned before that the better ones had different sized
pistons - This so the front of the pad gets pushed onto the disc harder
than the rear, thus reducing taper.
In any case, if you have tapered pads
they must be milled flat again or thrown out. It's that simple!
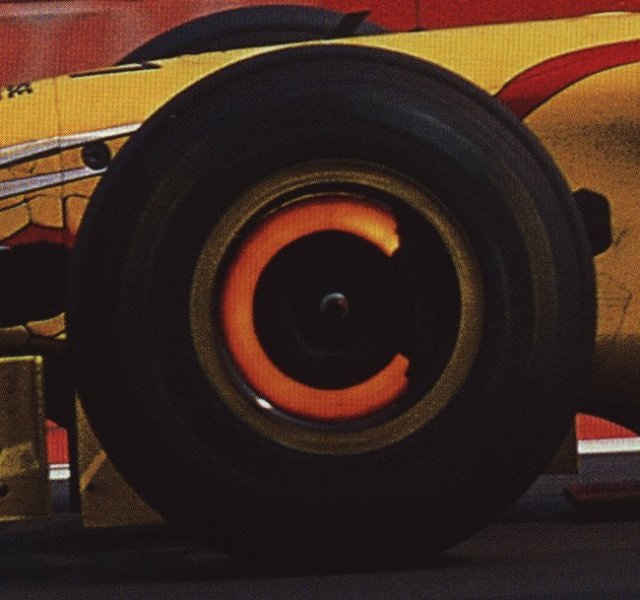
So how hot can brakes get??
I guess that the above picture answers your question - It's a picture of Damon Hill's Jordan Formula One car, under heavy braking. They use carbon-carbon brakes, which means that the disc pads and disc rotors are made from a carbon fibre matrix composite. They don't work very well when cold, and so have to be used a few times to get up to a good temperature. (~800°C)
On a slightly different track, one good trick I've learned when bleeding brakes is to use a different coloured fluid so you know when the new fluid has gone through the system. Good quality fluids are usually available in either clear, red, or green colours, thus making the job easier.
Speaking of hydraulic fluid, I was asked
recently to explain how to pick the correct master cylinder and brake
piston sizes.
When it comes time to selecting the size of
the master cylinder (I'm assuming that you'll be going for the single
master cylinder/balance valve option) you really only have a
choice of the aftermarket sizes between about 1/2" and 3/4", and they
usually go up in 1/16" increments. The most common size is usually
13/16", however. The 13/16" ones are often coupled with a vacuum
booster, and that's why they're so big. (The vacuum helps you push the
pedal, etc) If you go for a single cylinder, then you'll also
have to, by Law and common sense I believe, have to have one that has
twin (hydraulically separate) outputs. These can be commonly found on
the vast majority of modern cars.
The rules for master cylinder sizes are
simple - The bigger you have them, the harder you have to push the
pedal, but the less it moves. (Eg, the pedal in my racing moves
perhaps 1/4", then goes almost solid - I run fairly large master
cylinders)
The rules for the brakes themselves are
similar - If they have a large piston in them, then for the same given
brake line pressure they will have more clamping pressure on the disc,
thus giving better retardation. But they will also have a longer pedal
travel.
Getting the balance between having the right
size master cylinder and brake piston can be difficult, and it may take
some fiddling. It may seem a bit 'slack', but I would suggest that the
best way to get good brakes right from the start is to simply copy
some-one else's that is known to work well. Don't take their word for
it either - Drive the car to try it for yourself.
Another factor is the brake pedals' pedal mechanical leverage. It is typically about 4:1 to 5:1. Similar rules to the cylinder sizes, of course - The longer the pedal, the better the brakes work but the more the pedal moves. I personally much prefer a solid pedal that you have to push hard on, rather than a soft-ish one that moves a lot. I strongly believe that it gives you much better feel, and so control the brakes right 'on the limit' very accurately.
Back to the Drivetrain - Gearbox - page
For more motorsport links, try the motorsport section on my links page.
Back to the Index page
Page & contents where applicable © Bill Sherwood